The Frugal Conical Fermenter
With $100 in my hand, I went searching for a 10 to 15 gallon conical fermenter. My limited budget immediately eliminated all options for purchasing stainless steel or high density polyethylene conical from my home brew supply shop. It also eliminated any chance of piecing together a stainless steel conical fermenter using a hopper from Toledo Metal Spinning Company. By the time I included purchasing the weldless valves, a stand, and a cover for the hopper, it would cost $350 to $500. Home brewing has taught me to be more tolerant of the boys at the Pentagon who are notorious for blowing their budgets.
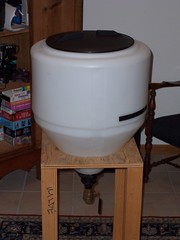
My search soon yielded a number of farm implement supply stores. I’m from Kansas, so I felt right at home. You might be surprised, but most of these stores carry a variety of food grade polyethylene storage tanks, ranging from medium to low densitypolyethylene. Upon further inspection, I soon came across a medium density polyethylene, conical (60 degree angle), 15 gallon “inductor” tank. Best yet, the price was right at about $60 plus shipping and handling.
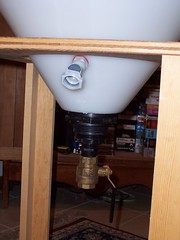
To the side is a picture of my inductor tank setup.
Now, it’s important to understand that these inductor tanks are made for Farmer Jones as opposed to Brewster Jones. So, I also had to buy some other parts to adapt it to home brewing. From research, I know that there are two basic components to any good conical fermenter. First, a dump port value at the bottom of the tank. This will allow me to harvest yeast. Second, a side port valve, placed at about 6 ½” to 7” above the bottom of the tank.
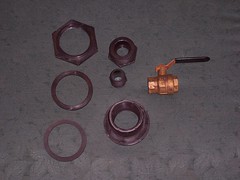
The inductor tank comes with a 2” (inside threads) polypropylene bulkhead with an EDPM gasket (both food grade) and a 12” screw on lid. I bought two additional parts in order to attach a 1” nickel plated dump value. The first was a 2” to 1” polypropylene reducer bushing. The second was 1” short polypropylene pipe nipple. Using a generous amount of Teflon pipe tape, I screwed each of these parts into each other and screwed on the 1” dump valve. Voila.
Over to the side is a picture of all of the parts of the bulkhead.
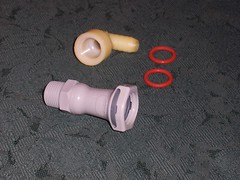
For the side port, I decided for the simplicity of quick disconnect valves (QD). Thus, I purchased ½” polypropylene male pipe thread QD with a shutoff valve along with a ½” Teflon female pipe thread with an angle barbed end. Yours doesn’t have to be angled or even barbed, it was just the part I could find at my local farm implement supply shop that would screw onto the QD. You will also need a couple of tight fitting food grade o-rings to butt up against the inside and outside walls of the conical. Luckily, I had two of them handy that I could use for the side port.
Over to the side is a picture of the parts for the side port. I drilled a hole in the conical, between the ½ gallon and 1 gallon mark and screwed together all the parts placing the o-rings next to the inside and outside walls of the conical.
I built my own stand with some spare lumber. But for those of you who are woodworking challenged, you can buy a stand from the manufacturer for about $60.
Like most decisions governed by a tight budget, you have to be prepared to pay a price. Let’s face it. When you pay for the best, you get smooth, buffed, scratch resistant, stainless steel; perfect for avoiding any harmful bacteria that may spoil your beer. But, I didn’t pay for the best, so I would be foolish to expect it.
Upon inspection, I found the inside of the conical to be smooth MDPE, without course ridges or other scratch marks. There were a few specs of dirt, molded into the polyethylene, but nothing that caused concern. Of course, the real problem with MDPE is that it is anything but scratch resistant.
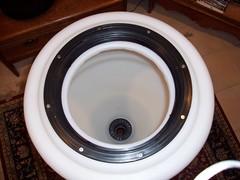
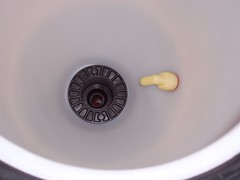
Another issue is the screw on lid. To accommodate the lid, the manufacturer has screwed on the top of the conical (using stainless steal self tapping screws), a black polypropylene lining with female threads (see picture). Even though this is a tight seal, it is not air tight. For those of you who care about totally closed fermentations, this is a negative. You could use food grade silicon sealant around this lining and on the protruding screws to create a sealed fermentation environment. But I have not done this. I don’t mind open fermentation.
The real drawback of this system is bulkhead for the dump valve. First, it creates a lip at the bottom of the conical, where liquid can pool. Second, there are threads exposed on the inside of the bulkhead, creating little nooks and crannies for bacteria. Fortunately, after using it a few times, I have found that proper cleaning and sanitation will eliminate these concerns. But, no doubt about it, you need to practice more vigilant cleaning and sanitation routines and special care to avoid scratching the MDPE.
It's kind of hard to see from this picture, but trust me, there is a lip at the bottom.
Whenever I read articles like this, I want to know the supposedly obvious answers to some stupid questions. For example: How do you get the large 3” nut, which tightens the bulkhead onto the conical, unscrewed from the bulkhead? Like most of you, I don’t have that large of a pipe or monkey wrench and to buy one would cost more than the conical! The answer is simple. I used a cheap wood clamp. Just tighten the clamp on the nut and turn.
What do you do for an airlock? There are two solutions. The simple one is nothing, given that the lid lining is not airtight. This is my preferred answer, but I’m lazy. Another solution is after sealing the lid lining with silicon and drill a hole through the center of the lid and attach an airlock.
How do you fill it with wort? Remember, this is a 15 gallon vessel. You don’t want to be moving this around once it is full. Not only is it heavy, it is also unwieldy. The easiest way to fill it is to siphon or drain the chilled wort into a 5 to 6 gallon bottling bucket. Then carry the filled bottling bucket to the room where the conical will be fermenting the beer. Place bottling bucket over the opening of the conical and turn on the spigot, letting the wort splash as it drains into the conical. This aerates the wort, eliminating the need for air stones.
How do you clean and sanitize an MDPE 15 gallon conical? Cleaning is a breeze. After the fermentation is done, I use hot water to spray down the inside of the conical to wash away any loose mess. I then fill up the conical with 100 to 115 degree water, just past the dried sediment(usually about 13 gallon mark). I then add Oxiclean (about half of recommended amount), taking care to swirl the water to help ensure the Oxiclean is dissolved. I then let is set in the Oxiclean mix for about 3 to 24 hours (whenever I get back to it). I drain a large quantity of this fluid out of the QD side port, to make sure it is cleaned. After it is drained, I spray it down with hot water. I try to avoid using even a wash cloth on the walls to avoid scratching them.
To sanitize, I follow the same procedures as noted above, only this time I use Star San instead of Oxiclean and use cold water instead of hot water. One could also use an iodophor, but, MDPE stains easily, thus, I use Star San. I am not fond of using chlorine on with any polyethylene equipment and don’t advise using it to sanitize or clean this type of material.
Also, I occasionally disassemble the polypropylene bulkhead and the side port (after every two or three uses). I then boil all the parts in water for 45 minutes (if not more) just to be on the safe side.
One final word of caution: Over the course of several weeks, air will start to permeate through the MDPE, oxidizing your beer. I have kept my beer in the conical for 3 weeks with no signs of oxidation. However, I don’t think it would be wise to ferment or lager in this vessel for an extended number of weeks.
Since getting this frugal conical, I have fermented 20 beers.